January 26, 2016

Marina Opina: MODERN CROCHET by Molla Mills

New section today!! (yay!) As I've told you here, in this section, my friend Marina will talk about her favourite arts and crafts books. Both new releases and classics. Marina is always up to date in terms of crochet. If you're as fond of crochet books as we are, you'll love this section. I'm sure you also have a great deal of books on your shelves, tell us about them!

Hoy estrenamos sección. (Yupi!) Como os comento aquí, en esta sección, mi amiga Marina, que está siempre al loro de las últimas novedades ganchilliles, nos hablará de sus libros preferidos, tanto de las últimas novedades como de los clásicos. Si os apasionan los libros de labores y sois coleccionistas como nosotras, esta sección te encantará. Seguro que tú también tienes una buena colección de libros en tu estantería. Nos encantará saber cuáles son y qué te han parecido!

Y ya sin más, os dejo con Marina Opina:

By Marina D. Bárcenas

In order to honour my platonic love for Finland, we will start having a look at "ModernCrochet" by Molla Mills.

Haciendo los honores al amor platónico que siento por Finlandia, vamos a empezar comentando el libro "Crochet Moderno", de Molla Mills, publicado por la editorial Gustavo Gili, la cual he de comentar hablando de todo un poco que no me puede gustar más.


Mentioning Molla Mills is talking about reinventing tapestry crochet and the use of rug yarn. As the title of her first book honestly and plainly indicates (she´s got already a third book in Finland), Molla adapts crochet to modern life creating accessories and projects for home; from folding an ugly cable making it beautiful to bags, rugs, jewelry and anything you can imagine, including what she calls pixel crochet, consisting of drawing motifs on graph paper that will be repeated to make a pattern in a single color.

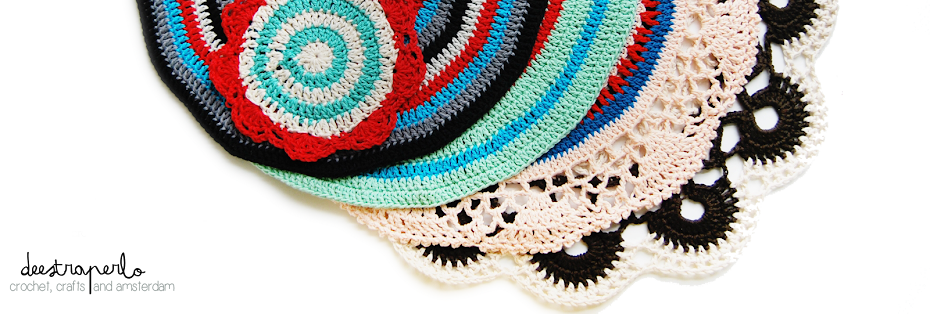
Hablar de Molla Mills es hablar de reinventar el uso del tapestry crochet y el trapillo. Como muy honesta y llanamente indica con el título de este su primer libro (en Finlandia va por el tercero), Molla adapta el ganchillo a la vida moderna, creando accesorios y proyectos para el hogar; desde forrar un cable feo y dejarlo monísimo, hasta hacer bolsos, alfombras, joyería y todo lo que se te pueda ocurrir, incluyendo lo que llama pixel crochet, que consiste en motivos dibujados sobre una cuadrícula que al repetirse forman un patrón en un solo color.


Talking about colors, she usually goes for black and white to design her patterns with a rockabilly touch sometimes, but always minimalist and nordic. There are even some brands that use her patterns to sell their products in the shape of a rug or a bag.

All in all, this book offers you 32 projects that will allow you to give your home a new look and to make a nice present for yourself.

Hablando de colores, generalmente escoge el blanco y negro para diseñar sus patrones, con un toque rockabilly a veces y siempre muy minimalista y nórdico. Incluso hay marcas que usan sus patrones para producir artículos a gran escala y venderlos en forma de alfombra o bolso.

En definitiva este libro te ofrece 32 proyectos con los que le podrás dar a tu casa un buen lavado de cara y auto regalarte algo bonito. En los patrones, separados por categorías, se indica nivel de dificultad, tamaño final, gancho e hilo a utilizar y peso aproximado.


MY PROJECT

Going through the patterns, which are presented by categories, you will find the difficulty level, size, recommended hook and yarn and approximated weight of the finished project. I got down to work and decided to make a rag yarn vase, which I choose because of its cute shape, perfect for my place.

If you are expecting to find patterns explained row by row as you may be used to, you may not find Molla easy to understand as she has her own way to explain the process. I personally don't find her easy to follow if you are a beginner. She includes explained step-by-step photos, but she does it her way. I would highly recommend you before starting to work in one of her patterns that you better read through it and if it´s a tapestry crochet pattern, that you draw what you read before starting, because you will definitely save time and avoid undoing what you have already crocheted until you understand what she means.

As a result, here we go with the rag yarn vase versioned by myself, as I used two different colors instead of one... dip dye is also stylish:

Me puse manos a la obra y decidí hacer un jarroncito de trapillo. Como ya comentábamos, ella es muy de usar este material, que si bien ya tuvo su boom en España, sigue dando muy buenos resultados. Lo escogí por tener una forma muy mona, perfecto para mi casa.

Si esperas encontrarte patrones explicados fila por fila a la manera a la que estamos acostumbrados, es probable que te cueste entender a Molla, que se explica un poco "de aquella manera". A mí personalmente no me parece fácil de seguir si estás empezando a hacer crochet. Cierto es que incluye fotos del paso a paso y las va explicando, pero a su manera. Yo te recomendaría que antes de ponerte a hacer uno de sus patrones te lo leas entero y si es de tapestry, que tengas al lado un cuaderno de cuadrícula para ir dibujando sus explicaciones, porque lo vas a necesitar si quieres evitar hacer y deshacer hasta que entiendas lo que te quiere decir.

Como resultado el jarroncito de Molla versionado a mi manera ya que utilicé dos colores en lugar de uno metiendo un poco de dip dye, que también se estila:

Last but not least, the final part of Modern Crochet seems quite interesting to me as I had never seen in before: finishing touches section. To give your project a professional look she shows you how to make labels and as the cherry on top, she refers to the crocheter's well-being with exercises and care suggestions.

La última parte de Crochet Moderno me ha parecido curiosa ya que es algo que no había visto antes: la sección de los toques finales. Para darle un toque profesional a tu proyecto te enseña a hacer y poner etiquetas y ya como guinda del pastel, termina con ejercicios para contribuir al bienestar del crocheteador.

I will see you here from now on with more books, reviews and projects!

January 18, 2016

Tip of the day: Magic ring

The Magic Ring is every crochet newbie's fear. When you start crocheting all you hear and read is about some "magic ring, magic ring..." There're magic rings everywhere and it looks difficult and scary. You keep crocheting single crochet rows, avoiding the moment when you have to face it. Well, you know what? It's not such a big deal! Actually it's very easy.

El anillo mágico es el temor de todo ganchillero novato. Cuando empiezas no haces más que oír "anillo mágico, anillo mágico!" por todas partes, no hay tutorial que no lleve uno. Y tú vas haciendo tus filas de punto bajo, evitando que llegue el momento en el que al fin tengas que enfrentarte a él. Pues sabéis qué? No es para tanto! De hecho es muy fácil.


This is a technique used when you work on the round and you want to avoid the hole in the middle, that's why it's very used in amigurumi. It's not easy to find an amigurumi pattern without several magic rings, so here's a piece of advice, forget your fears and start practicing this technique. You'll see how easy it is.

Esta técnica sirve para empezar trabajos en redondo sin dejar un agujero en el centro, por lo tanto es una solución perfecta para tejer amigurumis. Es difícil encontrar un amigurumi que no incluya unos cuantos anillos mágicos, así que te recomiendo que superes ese miedo y te lances. ya verás que en realidad es super fácil y práctico.

HOW TO MAKE SINGLE CROCHET STITCH IN A MAGIC RING
CÓMO HACER PUNTO BAJO EN ANILLO MÁGICO

1. Roll the yarn around your finger leaving the end of the thread in front and pass the part that goes to the skein over.
1. Enrolla el hilo alrededor del dedo, con el cabo hacia adelante y la hebra que va al ovillo pasando por encima.


2. Insert the hook in the middle of the ring, pull yarn through.
2. Inserta la aguja en el centro del aro y saca una lazada de la hebra que va al ovillo.


3. Now make a chain stitch: yarn over and pull up a loop.
3. Ahora haz un punto de cadeneta: vuelve a coger hebra y saca una lazada.


4. You can already take the ring out of your finger. Now make a single crochet stitch: insert the hook in the ring and pull up a loop. Yarn over and pull up a loop through the 3 loops on the hook.
4. Puedes sacar ya el aro del dedo. Ahora haz un punto bajo: inserta la aguja en el aro y saca una lazada. Coge hebra y sácala por las 3 lazadas que tienes en el gancho.


5. Now start crocheting as many stitches in the ring as your pattern calls for, always covering the yarn end and the left side of the ring.
5. Ahora empieza a tejer los puntos indicados en el patrón, siempre envolviendo el cabo y la parte izquierda del aro.


6. Once crocheted all the stitches, pull yarn end to seal the circle.
6. Una vez has hecho todos los puntos, tira del cabo hasta cerrar totalmente el aro.


We've seen how to make the magic ring when working in single crochet stitches, but what about the half double crochet and the double crochet?

Hemos visto cómo hacer anillo mágico con punto bajo, pero, qué pasa si tengo que hacer otros puntos?

MAGIC RING WITH HALF DOUBLE CROCHET
ANILLO MÁGICO CON PUNTO MEDIO ALTO

If we work in half double crochet, make 1 more chain in step 3. That's to say, 2 chains in all. Now make a half double crochet stitch in the ring: yarn over, insert the hook in the ring and pull up a loop. Yarn over again and pull a loop through the 3 loops on the hook.

Si trabajamos con punto medio alto, en el paso 3 haz una cadeneta más. Es decir, 2 cadenetas en total. Seguidamente haz un punto medio alto dentro del aro: coge hebra, inserta la aguja en el aro y saca una lazada. Coge hebra de nuevo y sácala por las 3 lazadas que tienes en el gancho.


MAGIC RING WITH DOUBLE CROCHET
ANILLO MÁGICO CON PUNTO ALTO

If we work in double crochet, make 2 more chain in step 3. That's to say, 3 chains in all. Now make a double crochet stitch in the ring: yarn over, insert the hook in the ring and pull up a loop. Yarn over again and pull a loop through the 2 firsts loops on the hook. Yarn over again and pull up a loop through the 2 remaining loops on the hook.

Si trabajamos con punto alto, en el paso 3 haz dos cadenetas más. es decir, 3 cadenetas en total. Seguidamente haz un punto alto en el aro: coge hebra, inserta la aguja en el aro y saca una lazada. Coge hebra de nuevo y sácala por las dos primeras lazadas del gancho. Coge hebra de nuevo y sácala por las dos lazadas que te quedan en el gancho.


Feel free to ask me your crochet existential doubts, send your questions to proyectocolcha@gmail.com or to my facebook fanpage

(Please notice that we're talking about basic crochet here, not about specific technics. We'll see specific technics in other blog sections, such as the crochet along, tutorials or patterns)

Si tienes más dudas existenciales mándalas a proyectocolcha@gmail.com o a mi página de facebook

(Ten en cuenta que en esta sección estamos tratando cuestiones básicas de ganchillo. Veremos técnicas específicas en otras secciones como el crochet along, los tutoriales o los patrones)


Share this post if you found it helpful! Thank you :) 
More crochet tips here.

Comparte este post si lo has encontrado útil! Gracias :) 
Más trucos de ganchillo aquí.

January 12, 2016

Minus' new armchair

Minus has a new friend. Her name is Actante Dourada and last Christmas she gave Minus the most wonderful present ever: a blue armchair with clouds, a special place to take a nap.

Minus tiene una nueva amiga. Se llama Actante Dourada y estas navidades le ha hecho el regalo más maravilloso de su vida: un sillón azul con nubes, para dormir la siesta.


Is well known that Minu's favourite activities are taking naps, eating cookies and watching pirates movies, so this armchair is just perfect for all of them. Besides, he's using Conchita's blanket, you can't ask for more.

Dormir la siesta es una de las actividades favoritas de Minus, después de comer galletas y ver pelis de piratas. Y me dice que este sillón es perfecto para ello. Además está usando la colcha que le regaló Conchita, no se puede pedir más.


Minu is all the time talking about his new friend "she's so nice, she's so smart, she's so pretty, bla bla bla..." Now he says that he wants to go on a trip and visit her! "But Minus, do you know where Galicia is? It's so far from here!" "I don't care, I want to go!"

Minus me habla todo el día de su nueva amiga, que si es muy simpática, que si es muy lista, que si es muy guapa... Ahora me ha dicho que quiere ir de viaje a su casa para hacerle una visita! "Pero Minus, tú sabes dónde está Galicia? Eso está muy lejos!" "Me da igual, yo quiero ir!"


He has his luggage ready. Conchita has borrowed him her jumper because she say's it's very cold in there. Minus says he's also bringing the blanket, Robinson Crusoe's book and cookies for the trip. "Have fun Minus! Have a good trip! Send postcards!" "Ok!"

Ya ha preparado la maleta. Conchita le ha prestado su jersey para que no pase frío. Minus dice que se va a llevar también la colcha, el libro de Robinson Crusoe y un paquete de galletas para el viaje. "Pásalo bien Minus! Buen viaje! Manda postales!!!" "Vale!"


We'll miss you Minus!

Te echaremos de menos!


Actante Dourada is a crochet designer that possesses one of the most wild imaginations I've ever known. Her amigurumis fascinate me and disconcert me at the same time. If you want to know more, visit her  blogFacebook and Etsy shop.

Actante Dourada es una de las diseñadoras de ganchillo con más imaginación que he conocido. Sus muñecos me tienen fascinada, me divierten y me inquietan. Para saber más sobre ella podéis visitar su blog, Facebook y tienda en Etsy.

Gracias Io por el magnífico sillón que has hecho para Minus. 

El patrón de la colcha de Conchita lo encontrarás aquí, y el jersey de Pickles está hecho con un patrón de Little Cotton Rabbits

You can create your own adventures with Minus, Pickles and Conchita too. You just have to crochet them and they'll show you their special world.
Find the patterns on  EtsyRavelry and AmigurumiPatterns.

Tú también puedes crear tus propias aventuras con Minus, Pickles and Conchita. Sólo tienes que tejerlos y ellos mismos te mostrarán su mundo especial. 
Puedes encontrar los patrones en  EtsyRavelry AmigurumiPatterns.

January 5, 2016

A Winter Hat


I love hats. I never wear them, though. I just love to knit and crochet them. Is this kind of project that you can make in 1 or 2 days, perfect for a gift. You can use endless materials, techniques, shapes and colors.

This hat is so easy that you're going to make hundreds, with different colors, I'd bet. What I like the most about this hat is how excessive it is; I find it so much fun, but not embarrassing enough to keep you from going out wearing it... It's crocheted using the very well known (for those who follow my patterns) proportional increase technique and we've added a bubble stitch from time to time, a ribbing a pompon and that's all. All of it techniques that we've already seen in other patterns!

Me encantan los gorros. Nunca los uso, la verdad, sólo me encanta tejerlos. Los gorros son otro de esos proyectos super atractivos para cualquier tejedor. Son rápidos y te permiten infinita variedad de formas, colores, técnicas. Son divertidos, puedes usar todo tipo de materiales y son un regalo perfecto para Navidad o un cumpleaños.

Este gorro es tan sencillo y rápido que os vais a hacer miles de colores distintos. Lo que más me gusta es lo poco discreto que es, me resulta muy divertido, pero no tan exagerado como para que te de vergüenza salir a la calle... Está tejido con la ya archiconocida (para los que seguís mis tutoriales) técnica del aumento proporcional, y le hemos añadido de vez en cuando una piña. A eso le añadimos un canalé abajo y un pompón arriba y ya tenemos nuestro gorro hecho. Todo técnicas que ya hemos visto anteriormente en otros proyectos!


You'll need:
8,00mm (L/11 - 0) crochet hook
100gr of super bulky yarn in white
50gr approx. of super bulky yarn in red
50gr approx. of super bulky yarn in blue
Tapestry needle big enough for this yarn
Scissors
Stitch marker
Pom-pom maker (or whatever you use to make a pompom)

Materiales necesarios:
Aguja de 8,00 mm
100 gr de lana tipo super chunky blanca
50gr aprox.  de lana tipo super chunky roja
50gr aprox.  de lana tipo super chunky azul
Aguja lanera para rematar
Tijeras
Marcador
Pom-pom maker (o lo que tú uses normalmente para hacer pompones)


1st round: 5 single crochet (sc) in a magic ring
2nd round: 5 increasing (inc) (10 sc)
3rd round: [1 sc, 1 inc] x5 (15 sc)
4th round: [1 bubble stitch, 1 sc, 1 inc] x5 (20 stitches (sts): 5 bubbles, 15 sc)
5th round: [3 sc, 1 inc] x5 (25 sc)
6th round: 2 sc, [1 inc, 4 sc] x4, 1 inc, 2 sc (30 sc)
7th round: [3 sc, bubble, 1 sc, 1 inc] x5 (35 sts: 5 bubbles, 30 sc)

1ª vuelta (vta.): 5 puntos bajos (pb) en anillo mágico
2ª vta.: 5 aumentos (aum) (10 pb)
3ª vta.: [1 pb, 1 aum] x5 (15 pb)
4ª vta.: [1 piña, 1 pb, 1 aum] x5 (20 puntos: 5 piñas, 15 pb)
5ª vta.: [3 pb, 1 aum] x5 (25 pb)
6ª vta.: 2 pb, [1 aum, 4 pb] x4, 1 aum, 2 pb (30 pb)
7ª vta.: [3 pb, piña, 1 pb, 1 aum] x5 (35 puntos: 5 piñas, 30 pb)


8th round: 3 sc, [1 inc, 6 sc] x4, 1 inc, 3 sc (40 sc)
9th round: [7 sc, 1 inc] x5 (45 sc)
10th round: [1 bubble, 8 sc] x5 (45 sts: 5 bubbles, 40 sc)
11th and12th round: 45 sc
13th round: 4 sc, [1 bubble, 8 sc] x4, 1 bubble, 4 sc (45 sts: 5 bubbles, 40 sc)
14th and 15th round: 45 sc
16th round: [1 bubble, 8 sc] x5 (45 sts: 5 bubbles, 40 sc)
17th round :45 sc, 1 slip sticth (sl st)

8ª vta.: 3 pb, [1 aum, 6 pb] x4, 1 aum, 3 pb (40 pb)
9ª vta.: [7 pb, 1 aum] x5 (45 pb)
10ª vta.: [1 piña, 8 pb] x5 (45 puntos: 5 piñas, 40 pb)
11ª y 12ª vta.. 45 pb
13ª vta.: 4 pb, [1 piña, 8 pb] x4, 1 piña, 4 pb (45 puntos: 5 piñas, 40 pb)
14ª y 15ª vta.: 45 pb
16ª vta.: [1 piña, 8 pb] x5 (45 puntos: 5 piñas, 40 pb)
17ª vta.: 45 pb, 1 punto raso (pr)


Ribbing
19th round: Using the blue yarn, chain (ch) 2 (count as a half double crochet), 44 half double crochet (hdc) (45hdc)
20th round: Ch 2 (count as a hdc), *1 front post hdc, 1 back post hdc. Repeat from * until the end.
21st and 22nd round: Repeat round 20.

19ª vta.:  2 cadenetas (cad) (equivalen a un punto medio alto), 44 puntos medio altos (pma) (45 pma)
20ª vta.:  2 cad (equivalen a un pma), *1 pma cogido por delante, 1 pma cogido por detrás. Repite desde * hasta el final.
21ª y 22ª vta.: repite la fila 20.

HOW TO CROCHET THE BUBBLE STITCH / CÓMO TEJER PIÑAS 


We'll start our bubble with a yarn over (yo) like in a double crochet (dc). We're crocheting a bubble in a different colour from the base colour, so *yo with the new colour, insert the hook in next stitch (st), pull up a loop. Now you have 3 loops on the hook, (see first picture), yo and pull through the 2 first loops. Repeat from * 4 more times until you have 6 loops on your hook, (see 2nd picture). Yo and pull through the 6 of them (3rd picture). Now change to base colour, chain 1 and keep following the pattern. 

Empezamos nuestra piña cogiendo hebra como si fuésemos a realizar un punto alto (pa). En este caso, al tratarse de una piña de un color distinto al color base , *cogemos la hebra del color nuevo . Insertamos el gancho en el punto especificado. Cogemos hebra y sacamos la aguja. Ahora tenemos 3 lazadas en el gancho,  (ver la primera imagen). Cogemos hebra de nuevo y la sacamos por las dos primeras lazadas. Repetimos desde * 4 veces más hasta que tengamos 6 lazadas en el gancho. Cogemos hebra y la sacamos por las 6 lazadas de golpe (ver tercera foto). Ahora hacemos una cadeneta con el color base y seguimos avanzando normalmente con el patrón. 


Be careful with  the row following to the bubbles one because you've kind of added a new stitch after each bubble by the "ch 1 " step, so in order to avoid that, work just one of the 2 stitches you'll find on top of the bubble. As you can see in the picture, skip the red and work the turquoise. And always count the stitches!

Ten cuidado con la vuelta siguiente a una vuelta con piñas, ya que al hacer una cadeneta cada vez que cerramos una piña puedes confundirte y añadir puntos de más. Para que esto no pase, trabaja sólo uno de los dos puntos que caen sobre la piña. Como ves en la imagen, salta el rojo y trabaja el turquesa. Y cuenta siempre los puntos!


HOW TO MAKE A FRONT POST STITCH HALF DOUBLE CROCHET 
CÓMO TEJER PUNTO MEDIO ALTO COGIDO POR DELANTE

Yarn over, with the hook in front of your work, insert it from right to left around the stitch post, (not in the loop as you would usually do). Finish the stitch as a regular half double crochet stitch.

Coge hebra.Con el gancho por delante del trabajo,  insértalo de derecha a izquierda rodeando la columna del punto (no en la lazada como harías normalmente). Termina el punto como un punto medio alto normal.


HOW TO MAKE A BACK POST STITCH DOUBLE CROCHET 
CÓMO TEJER PUNTO ALTO COGIDO POR DETRÁS

Do the same than in the front post but with your hook in the back side of your work. Yarn over, insert the hook from the back side, from right to left, and work a regular hdc.

Es básicamente lo mismo pero introduciendo el gancho desde la parte trasera de la labor. Coge hebra, introduce el gancho, por detrás, de derecha a izquierda rodeando la columna del punto, y haz un punto medio alto normal.


Our hat is ready. Now you just have to make the pompom, same color than the ribbing, attach it to the top, and you're done. Now go show it off! Let your neighbours know who has the coolest hat!

Nuestro gorro está listo. Sólo falta hacer un pompón, en este caso lo hemos hecho con la misma lana azul del canalé y lo cosemos en la parte superior. Ya está. Ahora a lucirlo por todo el barrio! Que te vean las vecinas!

Gracias Marina por ofrecerte para las fotos! <3

More cool ideas to stay warm this winter. Free and easy patterns!
Más ideas chulas para estar calentita este invierno. Patrones fáciles y gratis!

Related Posts Plugin for WordPress, Blogger...